Hands-on appliance repair
Whirlpool Oven Igniter Glows but Won't Heat
Our WFG505M0MS0 stalled near 155°F even though the igniter glowed. Replacing it with OEM part W11590294 restored prompt ignition, normal burner cycling, and reliable 350°F operation.
The quick answer
A glowing igniter can still be the failed part.
The original igniter became orange but did not reliably open the oven safety valve. The replacement igniter lit the existing burner promptly, and every post-repair test passed. No gas valve, temperature sensor, or control board was replaced.
Our Whirlpool gas range was less than two years old when the stovetop continued working but the oven stopped heating properly. The confusing clue was an igniter that looked alive. It glowed orange, yet the burner often stayed off.
What happened
The oven stalled near 155°F before it sometimes lit late
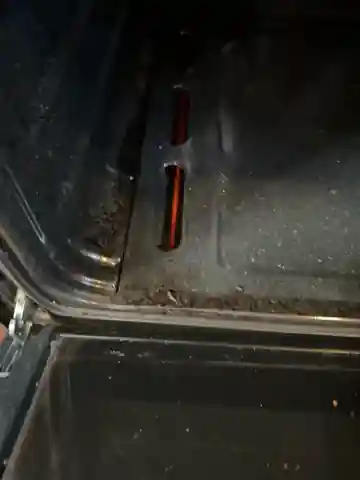
The controls accepted a 350°F bake setting and the displayed temperature started rising. It then stopped around 155°F. Through the slots in the oven floor, the bake igniter was visibly glowing orange, but the burner did not light normally and there was no noticeable gas smell.
On one attempt, the burner suddenly lit after a long delay and the oven eventually reached 350°F. That intermittent behavior made a weak hot-surface igniter the leading suspect. A completely open igniter may not glow at all. This one still glowed but could not start the burner reliably.
Part identification
The OEM igniter used in this repair
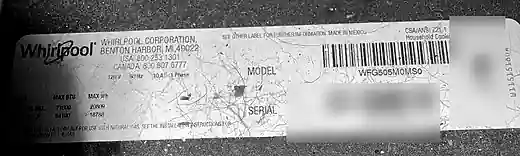
The range is a Whirlpool WFG505M0MS0. The genuine replacement installed was Whirlpool W11590294, a hot-surface oven igniter that Whirlpool lists as replacing W11208965.
Whirlpool OEM W11590294 oven igniter
Verify the full model number on your own range before ordering. Similar-looking Whirlpool ranges can use different parts.
Before opening the range
Disconnect electricity and close the manual gas valve
This repair involves household voltage, combustible gas, sharp sheet metal, hot surfaces, and a brittle ceramic igniter. I unplugged the range and closed its manual gas shutoff before removing any panels.
I did not loosen the yellow flexible gas line, oven gas valve, or any gas fitting. If you smell gas, stop immediately, avoid operating electrical switches, leave the area, and contact the gas utility or an appropriately qualified service professional.
This records a repair completed on one range. Stop if the wiring, connector, burner, or gas arrangement differs from what is described.
Remove the door, oven floor, and original igniter
Removing the oven door made the burner easier to reach. After moving both hinge locks to the removal position, I lifted the door out by its sides and placed it on a padded surface. I then removed the racks, lower oven floor, and burner cover.
Two small hex-head screws held the igniter beside the bake burner. One came out normally. The other became tight after backing out partway, so I worked it gently back and forth rather than snapping it. The burner tube and gas fittings stayed in place.
The unexpected problem
The genuine replacement did not plug into the range harness
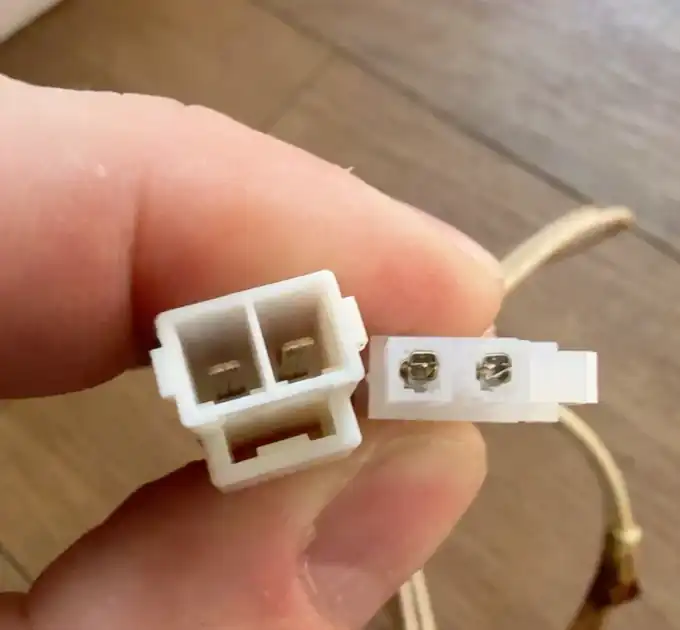
The original igniter leads passed through the rear oven wall to a white two-pin connector behind the lower galvanized cover. The new part's brackets, mounting holes, element position, and wire length matched closely. Its connector did not.
The new OEM igniter and the range harness presented the same mating configuration, so they could not connect and should not be forced together.
Retaining the original plug
I left the range-side harness untouched and retained the original igniter plug as a short pigtail. The old connector was cut off with several inches of its high-temperature lead wire preserved. The incompatible plug was removed from the new igniter, and the two pairs of leads were joined with properly rated ceramic connectors.
The pair used during this repair came from a local appliance-parts counter. Properly sized high-temperature ceramic wire nuts like these are also available online. Confirm the stated temperature rating and wire-gauge range before ordering. Do not substitute ordinary plastic wire nuts, electrical tape, or general-purpose connectors.
Cutting a new part's connector can affect return or warranty eligibility. Compare everything first. Use the supplier or a qualified technician when a factory plug-and-play repair is required.
Installation
Keep the splices in the protected rear compartment
The ceramic connectors were too large to remain safely beside the bake burner. I routed the new igniter leads through the original rear opening and positioned both ceramic splices and the retained factory plug behind the oven wall.
Each conductor passed an individual tug test, no bare copper remained visible, and the wires were given gentle bends and enough slack to avoid tension. The splices were kept away from sharp sheet-metal edges and gas components, and the rear cover was checked to make sure it could not pinch them.
The new igniter was mounted in the original position with the two factory screws, tightened only enough to secure the bracket. Its high-temperature leads remained clear of the burner tube, and the rear protective cover was reinstalled before power was restored.
Final verification
Every post-repair test passed
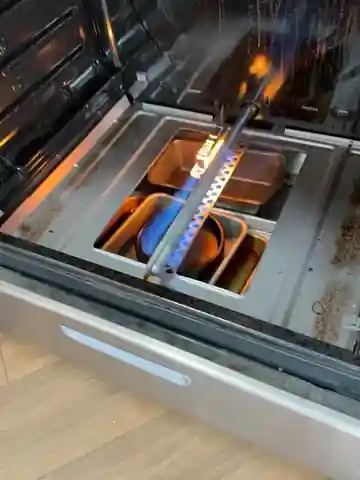
With hands and face clear of the oven, I reopened the manual gas valve, plugged in the range, selected Bake, and set it to 350°F. The new igniter became bright, the existing safety valve opened, and the burner lit promptly with an even blue flame.
After the visible test, the range was cooled, unplugged again, and fully reassembled. The final assembled test also passed. The oven reached 350°F normally, maintained the set temperature, cycled the burner off, and relit it correctly. The range has continued working well.
The bake burner lit promptly instead of stalling near 155°F.
The burner produced a steady, even blue flame along its length.
The fully assembled oven reached 350°F normally.
The burner shut off and relit correctly while holding temperature.
Common questions
Whirlpool oven igniter FAQ
Can an oven igniter glow and still be bad?
Yes. The original igniter in this Whirlpool range glowed orange but did not reliably cause the bake burner to light. After it was replaced, the existing safety valve opened promptly and the burner operated normally.
Why did the stovetop work while the oven did not?
The surface burners and bake burner use different ignition components. Working cooktop burners showed that gas was available to the range, but they did not prove that the bake igniter could operate the oven safety valve.
Does every W11590294 have the connector mismatch?
Not necessarily. The mismatch occurred between the genuine W11590294 received for this repair and the original harness in this WFG505M0MS0. Compare the old part, new part, and range harness before modifying anything.
Where is the model number on the Whirlpool WFG505M0MS0?
On this range, the model-and-serial label is on the left interior wall of the lower drawer opening. Pull the lower drawer completely out to see it.
Did the gas valve or control board also need replacement?
No. Once the new igniter was installed, the original gas valve opened normally, the flame was even and blue, and the fully assembled oven reached and held 350°F while cycling correctly.
Evidence and method
Sources
The failure pattern, connector mismatch, installation observations, and completed operating tests are original to this WFG505M0MS0 repair. Manufacturer and OEM-parts sources were used to confirm the range family and replacement-part relationship.
Reader questions
Have a question or correction?
On-site comments are paused. Email Jim with the guide title and relevant details.